<![CDATA[Uptonian Thoughts]]>2017-05-09T19:24:22-05:00http://blog.thomasupton.com/Octopress<![CDATA[My Favorite Albums of 2015]]>2016-01-04T12:22:28-06:00http://blog.thomasupton.com/2016/01/my-favorite-albums-of-2015This list is a little late, but when a contender for a top album of the year comes out on December 18, I like to wait until the actual new year to pare down the list. There’s no way that I could choose a “traditional” top ten. I had such a long list of amazing music that I listened to this year that even when I culled it to the things that were released this year I still had far too many.
I managed to come up with a healthy list of “top” albums and a few more “honorable mentions,” but really everything on this list is a favorite thing of mine from this year. This isn’t a “best of” list or anything of the sort. The albums aren’t in any order whatsoever and there are purposefully no numbers next to the list that follows. I tried to include a song and write a little blurb about my picks but really they are my favorite albums of the past year and are meant to be enjoyed as such.
Favorite Albums
Panopticon — Autumn Eternal
I discovered this one late, just like Panopticon’s previous release, while reading Stereogum’s list of the top metal albums of 2015. There are some great records there, so go check that out if the heavier records on the rest of my list interest you.
The album’s namesake track is a standout, but really the entire album is meant to be enjoyed at once. The Southern infusions apparent on Austin Lunn’s previous releases as Panopticon have mostly been replaced with colder, darker Midwestern roots – he moved from Kentucky to Minnesota recently – and that results in a heavier, colder sound.
Baroness — Purple
The fact that this album was just released less than two weeks ago doesn’t mean it’s not a contender for best of the year. The songwriting is top-notch and the riffage is heavier than ever. It’s so cool to see these guys back touring and writing music after their much-talked-about bus accident in 2014. The energy and emotion (and positivity!) on display on this record is clearly a direct result of the aftermath of that experience.
Cult Leader — Lightless Walk
From the moment the first note hits, you know this record is going to be brutal. That detuning chord makes your stomach drop, too, and “Great I Am” bursts through the subterranean cavern it just dug. It only gets more gut-wrenching from there. It’s not all just a bash-your-head-into-the-wall-of-sound experience though; there’s a dynamic on record that makes the restrained parts more beautiful and the chaotic parts uglier.
The song-writing is top-notch here. Heavy is not always about the riffage.
Alabama Shakes — Sound & Color
Better production, fame, and an Apple ad feature don’t diminsh the soul and feel on display in this record. Every song is a microcosm of Alabama Shakes: big vocals, Southern instrumentals, a strong rhythm section, and lots and lots of emotion.
The bottom line is that this record is the exact opposite of what everyone, including me, expected a followup to Sunbather to sound like. It’s heavier, dirtier, harsher, more emotional, and – yes – better than Deafheaven’s previous effort. The heavier parts are fuller, and the shoegaze-y post-rock-y parts are more soaring and beautiful than ever. I can’t wait to see where Deafheaven goes from here, but for now I’m content to listen to New Bermuda over and over and over.
Intronaut — The Direction of Last Things
“The Pleasant Surprise” is exactly apt for this record: I knew that Intronaut had a new album due out soon, but it was indeed a pleasant surprise in November when this album dropped. These songs have that signature Intronaut sound; the impeccable drumming, the funky basslines, and of course the great guitar work are all on display. But these songs are tighter than ever. The album starts with a ripper, then mellows out slightly, but the chops and intensity never let up.
Mutoid Man — Bleeder
I had the pleasure of seeing Mutoid Man live twice this year: once in a brand new intimate venue on Red River, and once in a festival setting at Fun Fun Fun Fest. Mutoid Man are the rare band that excel in both environments. They just seem to have so much (dirty sweaty) fun playing, and it shows in this new set of songs.
Cloudkicker — Woum
The influence of touring with Intronaut is apparent here: this sounds like the perfect mix of the mellower Intronaut sections and Ben Sharp’s impeccable guitar and production chops. I always look forward to new music from Cloudkicker, not least of all because I know it will be different and surprising and amazing.
Loma Prieta — Self Portrait
This album is weirdly lo-fi in terms of production, but somehow it works. “Satellite” is a bit of a departure from their usual sound, but it still maintains the chaos without being quite as traditionally “heavy”. I haven’t seen a whole lot of press about Loma Prieta recently, but I know they’re touring with some success. This is a band that I have yet to see live, but I really want to hear these songs in person.
Foals — What Went Down
I love everything about Foals. Everyone says this is the album that cemented them as an “arena rock” band, but their hooks have been huge for a while now. Fame and bigger venues hasn’t diminished the catchiness and unbelievable tightness of this band.
Rivers of Nihil — Monarchy
Vocals are not what I usually focus on when listening to music, and that’s especially true for heavy music, but the vocal style and production on display on Monarchy is just perfect. It helps that the music behind those vocals is tight and nasty, too. This is a band that I discovered this year. I’m ashamed so say that I kind of dismissed them at first based on their name and album cover; it seemed just a little cheesy to me. I quickly got past that from the moment the album starts. The title track really showcases this band’s sound – that great vocal production, technical guitar solos, breakneck drums – so listen to it above and then listen to the whole album.
Vattnet Viskar — Settler
Vattnet Viskar is a strange name for a band from New Hampshire – it means “the water whispers” in Swedish – and it certainly paints a picture before the first note is heard. Forget whatever you think from the band’s name and Settler’s album cover; this is American black metal at its finest. Comparisons to Sunbather are inevitable, but this is grittier and muddier and dirtier.
A note unrelated to the content of this album: it was very hard to find this album; it seemed to go in and out of availability on streaming services. It’s available on iTunes now though, and hopefully it’s here to stay.
Between the Buried and Me — Coma Ecliptic
More prog, less growls, and the amazing chops that we all know and love. This band keeps getting better and better. Colors is a nearly perfect album, and here we are four releases later to see that they have evolved their sound and found their pocket of prog metal that no one else can match. If you have not yet had the chance to see these guys live, make it your top priority when they next tour near you. They somehow manage to sound better live, which is a rare feat amongst bands in this genre.
The Armed — Untitled
Another album from a new-to-me-this-year band. I listen to this when I’m running and when I need to tune absolutely everything else out while working. It’s cathartically brutal and mindless in the best way possible. A side note: how does Nick Yacyshyn find the time to play drums for all of these bands?
Honorable Mentions
Beach House — Thank Your Lucky Stars
A “surprise” album that was even better than the one it definitely wasn’t a companion to.
Napalm Death — Apex Predator - Easy Meat
Napalm Death, or this incarnation of it, is on point. Seriously, how does a thirty year old band put our their best material at this point in their career?
From First To Last — Dead Trees
Maybe I’m biased because I backed this album on Kickstarter. Spencer Soletto’s vocals are a perfect match for FFTL’s heaviest and catchiest effort to date.
Battles — La Di Da Di
Weirder than ever, which is definitely a good thing. And I still haven’t seen these guys live…
Courtney Barnett — Sometimes I Sit and Think, and Sometimes I Just Sit
Great songwriting on display here. I love the refreshing take on “indie rock”; it’s kind of dirty and poppy at the same time.
Theories — Regression
I found this band via the seemingly-endless stream of emails that Metal Blade sends. For some reason, this one stuck. “Burnt Concrete” is such a bangin’ opener.
And for the record, I read and enjoy most of those Metal Blade emails; that wasn’t a complaint.
CHON — Grow
CHON is definitely best experienced live, but this album is as good a facsimile as you can get of that experience. I do wish they’d try to play some of the songs with vocals live, but I’m content with their ridiculous instrumental chops. These guys are so young and fresh, too, so I can’t wait to see what comes next.
All Get Out — Movement
I listened to this EP countless times when it came out. I have a feeling that their upcoming LP will make next year’s list.
Blanck Mass — Dumb Flesh
Such a weird album, but I expect nothing less from one half of Fuck Buttons. I love the musical experimentation on display here.
Sumac — The Deal
How can I not mention this supergroup made up of members of Baptists, Old Man Gloom, and Russian Circles? Weird and heavy.
]]><![CDATA[Installing the Latest ZSH on Travis CI]]>2015-08-20T20:25:07-05:00http://blog.thomasupton.com/2015/08/installing-and-using-the-latest-zsh-on-travis-ciI recently thought it might be a good idea to start using Travis CI to run builds of my personal repositories on a regular basis. A lot of my repositories are pet projects, but that doesn’t mean that I don’t depend on them on a daily basis.
That couldn’t be more true of my dotfiles. My zshrc and my vimrc get exercised tens if not hundreds of times per day. Sometimes I’ll make a change to test out something new, verify that it doesn’t blow up, commit it, and move on. That’s probably not the best way to do things, but I figure that I’ll never start using the new hotness if I don’t jump in and start using it right away. Usually this works out well and I’ve simply added a new tool to my repertoire, but it can potentially break my environment in subtle ways. Continuous integration can help with that: if I commit a breaking change, I can get an email when the “build” breaks. I’ll immediately know which commit broke something without having to resort to git blame or something similar.
Travis CI offers a fantastic free service, but I haven’t really had a chance to use it yet.1 I figured that setting up CI for my small dotfiles repository would be a great way to learn a tool that many open source projects use today.
There was one huge hurdle: I use zsh, and most of my dotfile setup scripts are written in zsh, but the Travis environment only comes with the bash shell installed.2
Some existing opensource projects use Travis with zsh, but they all use the legacy environment that still allows sudo, not the newer container-based environment. The apt addon can help install packages in containers, but the latest version of zsh on Ubuntu 12.04 is 4.3.17. zsh 5 is a requirement for most modern usages, so that’s a non-starter. I thought that someone would have come across this already and solved it, and maybe they have, but I couldn’t easily find a solution.
We need to build and install zsh, and we need to do it without sudo. build-essential is already available on the Travis CI virtual machines, and we could use the aforementioned apt addon if it wasn’t.
After much trial and error, I finally got a Travis config that makes sure a recent version of zsh is set up before running the build. I chose to do this in the before_install step because that seems to be where additional dependencies should be installed, but I suppose it could be done anywhere in the build lifecycle before script runs the actual tests.
The full Travis config follows, but the before_install step is what really matters:
123456789101112131415
language:shaddons:apt:packages:-build-essentialbefore_install:-export LOCAL="$(mktemp --directory --tmpdir=${TMPDIR:/tmp} local.bin.XXXXXX)"-curl -L http://downloads.sourceforge.net/zsh/zsh-5.0.7.tar.gz | tar zx-cd zsh-5.0.7-./configure --prefix=$LOCAL-make-make install-cd --export PATH="$LOCAL/bin:$PATH"script:make test
First, we make a temporary directory to install zsh to. Remember, no sudo means no access to /usr/bin/local, so we need to choose a safe location to install.
Next, we download the latest version of zsh. If you want to use a different mirror or download an archive with a different compression, you just need to change this line to handle that and the rest should work. If you change the version, make sure to update the following line that changes directories to the archive you just decompressed.
Then we build zsh: configure with the prefix set to the directory we created earlier, then make it and make install it to the prefixed directory.
Finally, we cd back to the directory we were in – these build lifecycle steps are run in series so we need to hop back to the directory we were in before building zsh – and, more importantly, we add the temporary directory to the beginning of our path so that zsh can be found.
These before_install steps could probably be extracted into a script, but I wanted to go with the simplest Travis config with the least overhead to get up and running with zsh. Now, when the test script runs, zsh is available and we can check our scripts for errors!
I look forward to exploring more of what is possible with Travis. On my horizon: using vint to lint my vimrc and writing tests for the majority of my private repositories that don’t currently have any verification.
We use Jenkins at work, which is a blessing and a curse. Mostly the latter, but the sheer number of plugins available coupled with the fact that I work with some awesome people who know Jenkins better than I ever will makes it ok. ↩
Really, it comes with whatever shell is default for the operating system that Travis VMs use. Since they run Ubuntu 12.04, that means that bash is available but zsh is not. It seems like Travis didn’t set out to explicitly support shell-based projects, but because their machines are (mostly) Linux, that comes for “free” if you know how to configure things. ↩
]]><![CDATA[Migrating from Pathogen to Vundle]]>2014-02-11T19:41:00-06:00http://blog.thomasupton.com/2014/02/migrating-from-pathogen-to-vundleFor a while now, I’ve been using Pathogen to manage my vim plugins as bundles. I thought I was making things easier for myself by using git submodules to help organize those plugins, but submodules aren’t the best method for deploying a vim environment in multiple places.
Fortunately for me, other, smarter people did this same thing and decided to fix it. This blog post by James Lai details moving from almost the exact same system as mine to Vundle, a newer and very vim-centric way of managing plugins. You list your plugins in your vimrc, you update them with vim (even though they are managed with git), and your vim environment is consistent everywhere.
I just migrated from Pathogen to Vundle, and I want to document the process.
First things first: clone Vundle into your bundle/ directory.
The Vundle quick start guide does a great job of getting you started, so if you’re just looking to use Vundle without any prior bundle management, I would start there. If you were managing your vim plugins with Pathogen and git submodules, the switch to Vundle is straightforward but requires a few more steps.
At the top of my vimrc I added a new Vundle-specific section and added the code from the quick start guide.
123456789
" Of coursesetnocompatible" Required Vundle setupfiletype off
setruntimepath+=~/.vim/bundle/vundle
call vundle#rc()Bundle 'gmarik/vundle'
Next, I wanted to add all the bundles I already use. git submodule foreach can actually help here.
I then just copied the GitHub user and repository name (the path portion of the remote URL minus “.git”) and passed that to Vundle’s Bundle command.
1234567
" Better status lineBundle 'bling/vim-airline'" ga for character descriptionsBundle 'tpope/vim-characterize'[...]
Now we need to remove the existing submodules. One of the big pains of using git submodules is removing them when you no longer need them. This made trying out plugins harder than it needed to be, and it makes the transition to Vundle a bit more complicated.
I reference this Stack Overflow post about removing git submodules every time I need to remove a plugin I was just trying out without fail. The command to remember is git submodule deinit. You can deinit all submodules in a given directory all at once.
1234567
❯ git submodule deinit bundle/
Cleared directory 'bundle/airline'Submodule 'bundle/airline'(https://github.com/bling/vim-airline.git) unregistered for path 'bundle/airline'Cleared directory 'bundle/characterize'Submodule 'bundle/characterize'(https://github.com/tpope/vim-characterize.git) unregistered for path 'bundle/characterize'[...]
Then you need to explicitly remove all the bundles. Since Vundle is already in bundle/vundle, we need to remove each separate plugin bundle directory instead of blowing away the entire bundle/ directory.
It woud be a good idea to commit your staged changes here, which at this point should just be submodule removal.
If you were using Pathogen, don’t forget to remove any setup from your vimrc.
123456
" Store pathogen itself in bundle/runtime! bundle/pathogen/autoload/pathogen.vim" Start it upsilent!call pathogen#infect()silent!call pathogen#helptags()
It also helps to add bundle/ to your .gitignore. Vundle now puts all plugins there, but you don’t have to manually manage them any more.. Just add bundle/** to your vim environment’s .gitignore file.
Now, open up vim and run :BundleInstall. All your vim bundles will be cloned and managed by Vundle, and you don’t have to worry about updating submodules and running git submodule foreach everywhere you have a vim environment.
To update and migrate any existing vim environments on other machines, git pull in the migration changes, which shouldn’t conflict as long as you were up to date to the commit before the migration. Then clone Vundle with git clone https://github.com/gmarik/Vundle.vim.git bundle/vundle and install your plugins with vim +BundleInstall +qall.
If you were not up to date to right before your migration changes, you’ll probably have to manually remove all submodules by following the instructions above and resolve some conflicts when pulling changes in. Since you’re trying to delete all of bundle/, this should be relatively painless: just delete bundle/ and git rebase --skip any submodule update commits.
And now you’re using Vundle! Add some new bundles into your vimrc, run :BundleInstall, and you’re up and running. I found some that I’m going to try out in joegoggins’s vimrc and in the Vundle setup documentation.
]]><![CDATA[Quickly convert Unix timestamps]]>2013-10-20T10:03:00-05:00http://blog.thomasupton.com/2013/10/quickly-convert-unix-timestampsInevitably, when dealing with time-related data, one will come across Unix timestamps. They’re
great; there’s no guessing the timezone or trying to parse difficult formats and they’re generally
extremely useful.
Except they’re not very readable to humans. I use Epoch Convertera lot when I’m dealing
with time-series data, which seems to be fairly often recently. Anything involving a calendar or
picking a time range also usually involves timestamps. I thought there must be an easier way to
convert these into something that I can read without going to an external site and that doesn’t
break down when I’m trying to do work with finnicky or non-existant network connection.
There is:
1
date -j -f "%s""1381528800" +"%a %b %d %T %Z %Y"
An explanation: -j tells date not to try to set the system date. -f describes the format of
the input - a timestamp, of course - and the input itself follows. The string after + is the
output format. The output of the above is as follows.
Fri Oct 11 17:00:00 CDT 2013
You can use xargs to pipe input in. Note that the -J option might be different on systems that
are not OS X.
Like I seem to do with a lot of my utility scripts, I added a workflow to Alfred. You can get it
here. Simply invoke Alfred, type “ts” followed by a space and the timestamp you want to
convert. The readable date will be posted as a notification (Growl or Notification Center,
configurable in the Advanced section of the Alfred settings) and copied to the clipboard.
]]><![CDATA[Remove leading whitespace]]>2013-10-13T14:28:00-05:00http://blog.thomasupton.com/2013/10/remove-leading-whitespaceSometimes it’s useful to copy some code from a file and paste it somewhere else as an example. For
instance, I like to write code in a jsfiddle and then paste a relevant subset of that
code to a Stack Overflow answer. I have also copied code from a project file to paste into
HipChat to quickly explain something to a coworker, or to paste into a JIRA ticket as a comment.
If you copy code from the middle of a file, there’s usually some leading whitespace on all lines
that you do not want to preserve in the context into which you are pasting the code. The problem is
that you don’t want to get rid of all leading whitespace on all lines; you want to keep the
indentation intact. I usually get rid of the unwanted whitespace by manually deleting it
if it’s only one or two lines or by pasting into a new vim buffer and using << to shift the text
over as much as desired.
I knew there must be a way to remove the shortest leading whitespace from all lines
programmatically, but I’m not familiar enough with awk, sed, or shell scripting in general to
tackle the problem. I asked the question on Stack Overflow and got a few great answers. I
ended up accepting the single process awk version.
If you use OS X, the built-in awk will not work with the given solution. If you use
Hombrew, fixing that is just a simple matter of brew install gawk and using gawk instead
of awk.
The given solution has a great explanation and works fine, but I made one addition. If the input is
a single line with no leading whitespace, the script fails. I fixed this with if (!s) s=0; at
the beginning of the END block.
The final version of my command looks like this. I’ve added some comments to explain what’s going
on.
1234567891011121314151617
gawk -F '\\S.*'\ # The awk field separator is everything after the first non-whitespace character, inclusive'{ # The first block of the awk program l=length($1); # The length of the first field, the leading whitespace if(l>0) # If the length of whitespace is non-zero, if(NR==1) # and this is the first record, s=l; # make 's', the number of whitespace characters, equal to its length else s=s>l?l:s; # otherwise, make s the shorter of itself and the current whitespace a[NR]=$0 # Index the entire line in an array by line number} # End of the first block of the awk programEND{ # Start the END, printing block of the awk program if(!s)s=0; # Make sure we always have a value for s for(i=1;i<=NR;i++){ # Loop over all records sub("^ {"s"}","",a[i]); # Substitute 's' whitespace characters with nothing print a[i]; # Print the line after substition } # End of the loop over records}'# End of the END block of the awk program
It is worth noting that this probably only works on text with spaces for whitespace, not
tabs or mixed whitespace.
Integrate with an Alfred workflow
The ability to remove the shortest leading whitespace with a shell command is great, but I really
wanted a way to do this quickly with text on the clipboard. Alfred workflows make that
possible.
I created a simple three step workflow with a hotkey trigger, a script action, and a clipboard
output. You can download it here and use it with Alfred 2.
And now you can copy code in context and paste it with no leading whitespace wherever you want!
]]><![CDATA[Batch Deleting Last.fm Scrobbles]]>2012-08-12T20:06:00-05:00http://blog.thomasupton.com/2012/08/batch-deleting-last-fm-scrobblesI recently came home from a trip and synced my iPhone in iTunes in an attempt to scrobble the music
that I listened to on that trip. I use Melo to scrobble tracks played in iTunes, and it usually
works quite well because I never know it’s there.
I’m not entirely sure if Melo, iTunes, or Last.fm is to blame, but I ended up with a large amount of
scrobbles from a repeated handful of songs. I have over 75,000 tracks scrobbled in Last.fm, but I
use their recommendations and like to look at my stats, so artificially inflating my scrobble
count with three artists was extremely undesirable.
I had 59 pages of unwanted scrobbles; I needed to quickly delete nearly 3000 scrobbles. Last.fm
doesn’t have a way to batch delete (or otherwise manage) your scrobble tracks, so I manually clicked
all the delete links on the first page.
That got old before I had even deleted ten scrobbles. I figured out a way to programmatically and
quickly delete a page of scrobbles. I still have to manually get to each page, but this makes it
much easier.
UPDATE 2017-05-09:
Thanks to a reader, I was informed that the site design has changed yet again, requiring a new selector for the delete button. The new code should now be as follows (thanks AN and Slype!):
Since the new Last.fm redesign recently went live after being in beta for a while, it looks like the selector in the above code needs to change. Thanks to @jayholler, the code should now be:
I just open up the console with ⌘-⌥-I, paste in that snippet of code, and hit enter. Here is what
it looks like in action.
Since jQuery is already embedded in Last.fm’s pages, I just select all the delete links and
emit a click on each one. The entire page is deleted in a few seconds. When it’s done, I can click
the link to the previous page and repeat.
I don’t expect this will be very useful to anyone but myself for the next ten minutes, but it could
come in handy in case you’ve been listening to too much Carly Rae Jepsen.
]]><![CDATA[Duplicate Posts In The Feed]]>2012-07-26T09:23:00-05:00http://blog.thomasupton.com/2012/07/duplicate-posts-in-the-feedWhen I first switched over to Octopress, the feed for this site was completely new. The last
twenty or so posts showed up as new again, and it was kind of annoying.
I realized yesterday that my site was still configured to be hosted on tupton.github.com, so
I switched it to blog.thomasupton.com. This must have reset the site’s feed again, causing
recent posts to show up as unread.
This should hopefully be the last time that happens, and hopefully it wasn’t too hard to mark all
posts from this site as read. I apologize for any inconvenience.
]]><![CDATA[Octopress]]>2012-07-19T23:05:00-05:00http://blog.thomasupton.com/2012/07/octopressThis blog is now being served by GitHub Pages (source) by way of Octopress. I’ve
tried to set up some redirects from the old site that should match up pretty well, but please let me
know if something looks awry.
There aren’t any site comments here anymore, so feel free to let me know on Twitter
@thomasupton or email.
]]><![CDATA[Reading My News]]>2012-07-12T18:12:22-05:00http://blog.thomasupton.com/2012/07/reading-my-newsI’ve used Google Reader for a long time, but I’ve never been completely satisfied with using it to
read and keep up with RSS feeds. Apps like Flipboard on the iPad provide a better
reading experience for traditionally “newsy” outlets – I enjoy flipping through the feeds from The
New Yorker, The Economist, and The Atlantic – but following feeds where every item is of
personal interest to me doesn’t make much sense in that context, and it’s iOS-only. I had used
NetNewsWire a few times in the past, but I never stuck with it for some reason. It’s
a great app, but I would constantly get distracted by that big red badge with a huge number of
unread items in it.
I realized that my problem wasn’t really the apps I was using. What really made reading my feeds
imperfect – or even tedious – was the number of feeds I had and how I was reading them. I decided
to revisit NetNewsWire and check out an app on iOS that I had heard great things about.
Prune
The first key to revamping my news reading was pruning my subscriptions. I had way too many
high-traffic feeds, and I wasn’t even reading 1% of some of them. I would go through all my feeds
and folders and mark everything as read every few days1 just to keep up and feel like I
wasn’t overwhelmed.
I got rid of feeds from sites like Lamebook, which is hilarious, but I don’t need to
read every single item, and Absolute Punk, which is a great source for music news, but I only
want to read a very small portion of those stories. I get my fix from these sites by visiting them
every few days, not by trying to forge through a murky river of hundreds of RSS items that I don’t
want to read.
I now have 26 feeds in 8 categories,2 down from twice that before pruning. This is
manageable. 50+ high-traffic feeds are not. I can read the items from these feeds quickly, and I
can finally read “all items” without becoming overwhelmed.
NetNewsWire, revisited (again)
I mentioned that I had used NetNewsWire before, but it never stuck. A couple of weeks ago, I saw
this NetNewsWire setup and knew I had to try it. ⌘-⇧-R and ⌘-/ are now my favorite
keyboard shortcuts. Refresh, and then scroll through my unread river of items. I sort
chronologically so I read posts “in order,” but I don’t think it actually matters much at all.
Since I have a low number of feeds, it usually only takes a few minutes to travel through these
unread items. Any links to things I want to check out in more depth later get a quick ^-P to send
to Instapaper.
Reeder on mobile
I was recently on vacation without my MacBook, but I had my iPad and still wanted to keep up with my
news and feeds. There are plenty of other times that I’m without my computer but have a chance to
catch up on my reading. I figured (or hoped, really) that I could make the experience of reading
news on my iPhone and iPad just as great as it is with NetNewsWire at my desk.
I had heard great things about Reeder on iOS, but I was skeptical that it could work for
me. It turns out I can get nearly the same river of news setup as NetNewsWire in Reeder. Unread
items can be sorted in chronological order, and moving to the next item is just a matter of swiping
up.
The end result is that I have a streamlined way to catch up on news that’s important to me as
quickly as possible, no matter where I am. I spend less time fiddling with news items I don’t really
care about, less time out of my day being distracted by the latest hot article,3 and more
time doing what I want and need to do.
I did this ritual for far too long before I realized it needed to end. Old habits die hard. ↩
I’ve noticed that a lot of sites and blogs I read will “cross-post” each other’s items. This sounds like it might be annoying to have to read about the same things in multiple places, but usually one of two things happens: either the cross-posting contains a bit of insightful back-and-forth on a topic, or multiple people link to a great article elsewhere that I know I need to check out. I get to follow great discussions and the cream of the hot topic crop rises to the top of my news readers. Win-win for me. ↩
If only I could figure out how to stop checking Stellar so much. ↩
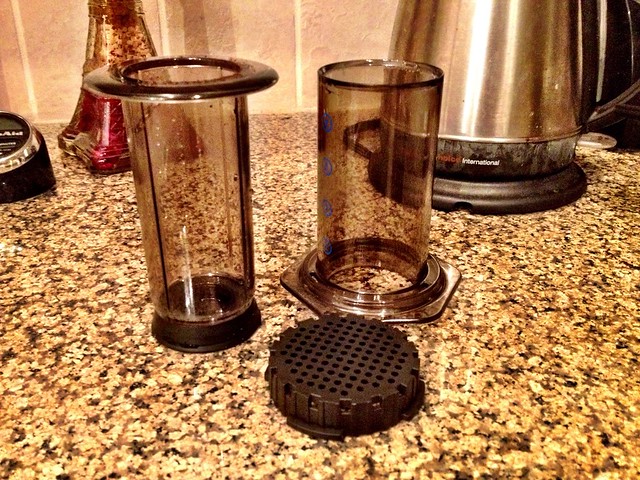
I don’t think I’ll be using my Keurig much anymore.
I’m extremely late to this party, but I only recently discovered Aerobie’s Aeropress
coffee maker. Yes, the company that created those amazing ring-shaped flying discs
also sells a weird-looking coffee maker. This plunger-like contraption helps to brew what is
probably the best cup of coffee I have ever tasted.
At first glance, it’s similar to a French press, but because the coffee is forced through a paper
filter instead of a coarser wire mesh, there is little to no sediment in the resulting liquid. The
coffee is described as “espresso-strength,” and I drink it as an Americano by adding a volume of
water equal to two times the amount of espresso. I’ve made Aeropress coffe with dark and lighter
roasts, and every cup of coffee has been exquisite.
If you enjoy coffee at all, I highly suggest you acquire an Aeropress as soon as possible. Once
you taste its delicious brew, you’ll understand why. It’s inexpensive, quick, easy to clean, and
delicious. There are no downsides.
]]><![CDATA[Knowing The Rules]]>2012-06-27T20:55:48-05:00http://blog.thomasupton.com/2012/06/knowing-the-rulesYou’re likely to be more comfortable with many situations if you know the rules of the environment
you’re in, including knowing its bounds and how flexible they are.
It sounds so obvious when it’s printed on the page in front of you, but if you’re more familiar with
a situation, it frees up your mind to focus on other things that you need to do or are good at. You
stop worrying about whether you’re within the acceptable bounds of your current situation and just
do what you’re good at. “Apprehension” is usually just a term we use when we come across a situation
that we don’t quite fully understand.
Take, for example, the security lines at most American airports. If you place someone in that
situation who has never been there before, it would most likely be very overwhelming. There are
uniformed people with badges who don’t quite look like police, everyone is taking off their shoes,
but not before they hand two important documents to one of the faux-police, and then you have to
walk next to these weird doorway things but there are two kinds and one you have to pause in the
middle and turn sideways and oh yeah you remembered to take everything out of your pockets before
this, right? It’s overwhelming to someone who’s not familiar. To someone who travels often, however,
it’s positively rote.
Clearly, you don’t need to spend ten thousand hours going through security lines to
become comfortable with air travel. Even one experience where you’re out of your element but aware
of your surroundings helps to prepare you for the next time. It’s obvious that the more you know
something, the better you are at it. But so many people seem to not take the time to learn the
rules and boundaries and then continually “wing it” while being overly-anxious.
An article I recently read about how some anxiety is necessary might initially seem like
it’s a counterpoint to this, but there’s a big difference between being prepared and being
complacent. Even that article mentions that you have to get the balance just right lest you become
lazy. Sports are a great example here. You have to know the game you’re playing inside and out and
have finely-honed fundamental skills so you can focus most or all of your thinking on strategy or on
the dynamic parts of the game that your instincts cannnot help with.
Even “simple” things, like how to interact in social situations, can be made easier if you think
about the rules. It’s probably not a good idea to talk about that weird rash on your lower back, but
it is a good idea to talk about a great beer you tried recently, or how the playoffs are going, or
that you’re thinking about getting a dog. The basic rule there is “don’t be creepy.”
The hard part is knowing the rules in the first place. That comes through experience, and sometimes
a little research – Googling, asking your friends or family – beforehand comes in handy.
]]><![CDATA[Syntastic]]>2012-05-20T14:13:08-05:00http://blog.thomasupton.com/2012/05/syntasticI love writing with vim, but — for many valid reasons — some people are averse to it. I think the
steep (–ish) learning curve has something to do with it, but I think some people really don’t want
to give up their IDE. The thing is, vim isn’t just a text editor. You can extend it to do pretty
much anything, including features that normally show up in IDEs.
I recently started using syntastic, which is a vim plugin that runs linters or syntax checkers
and displays warnings and errors right in your window. IDEs like Eclipse or Xcode provide this
syntax-checking for a couple of languages, but syntastic supports many languages and linters out of
the box with pluggable support for nearly any language.
Setup
If you use pathogen like every sane vim user does, installing syntastic is just like any other
plugin. Clone the repository or create a submodule in bundle/syntastic and you’re ready to go.
I mainly work with Javascript, Python, HTML, and CSS, so that’s what I’ll talk about. It’s worth
checking out the syntax checkers in bundle/syntastic/syntax_checkers/, even if you just look at
the list of files there. You might have to dive into the files to figure out which linters are
actually supported as it’s not clearly documented.
Before we get to configuring individual syntax checkers, syntastic itself has a couple of
configuration options. Syntastic has what it refers to as a “mode map”, which is basically just a
way to configure which file types are checked. Here is the relevant config option from my
vimrc:
1234
" On by default, turn it off for htmlletg:syntastic_mode_map = { 'mode': 'active', \ 'active_filetypes': [], \ 'passive_filetypes': ['html'] }
The ‘mode’ option set to active means that syntastic is on by default, so we can leave the list of
‘active_filetypes’ empty. The ‘passive_filetypes’ names filetypes that syntastic does not attempt to
check. I don’t check HTML files because I mainly work with templates that either can’t or won’t
validate with most HTML syntax checkers. If templates use non-standard attributes, it’s hard for a
syntax checker to do its job.
Python
Setting up syntastic for use with python was extremely easy. Just install pyflakes with
pip install pyflakes and set up some related options. I ignore certain errors regarding
whitespace, indentation, and end-of-line backslashes, but those are all customizable. See the pep8
error code documentation for an explanation of the error codes.
123
" Use flake8letg:syntastic_python_checkers = ['flake8']
letg:syntastic_python_flake8_args ='--ignore="E501,E302,E261,E701,E241,E126,E127,E128,W801"'
Javascript
There are a number of Javascript linters, including JS Lint and Google’s Closure
linter, but I decided to use the communtiy-driven JS Hint. JS Hint can be
configured with a jshintrc, which just is a JSON object that contains options. There are two
categories of options: those that enforce stricter rules than the defaults and those that relax
default checks. The options page of the jshint website does a great job of
explaining each option. You can view my jshintrc on my Github page. I added a few
“enforcing” options, but the only “relaxing” option I use is sub, which allows
subscript notation when accessing properties, e.g. this['domNode'] as well as this.domNode.
You can tell syntastic to use jshint with the following config option:
12
" Use jshint (uses ~/.jshintrc)letg:syntastic_javascript_checkers = ['jshint']
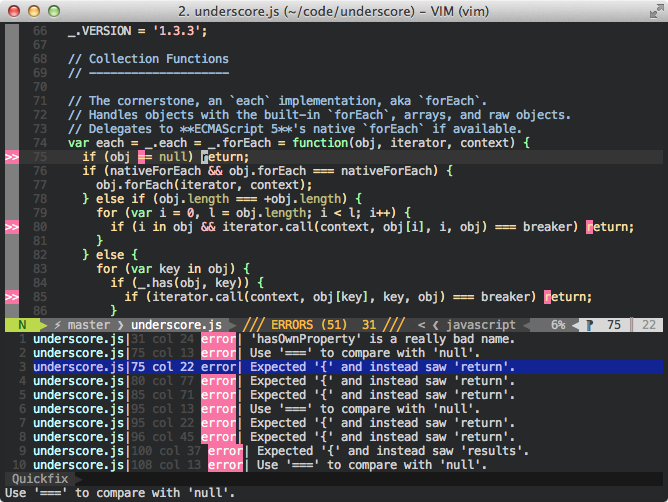
Usage
By default, syntastic runs your file through the configured filetype’s linter whenever the buffer is
written. If there are errors, they are highlighted inline. When your cursor is on a line with an
error, the description of the error is visible in the status line. You can use the :Errors command
to open a quickfix window with a list of all errors in the file. Pressing enter on an error will
take you to that line in the file. Syntastic uses vim’s signs, which means that a
gutter with a sign appears on the left side of every line with an error on it, making it easy to
scan the buffer for errors. You can change these symbols with some syntastic options.
You can configure syntastic in many other ways, including telling it to check a buffer whenever it
is opened. I explored the help file (:help syntastic) when I first started using syntastic, and it
was incredibly helpful. I encourage anyone who uses syntastic to do the same.
Syntastic has already helped me avoid many typos and silly errors that would ordinarily be hard to
track down. It’s an invaluable tool in my workflow.
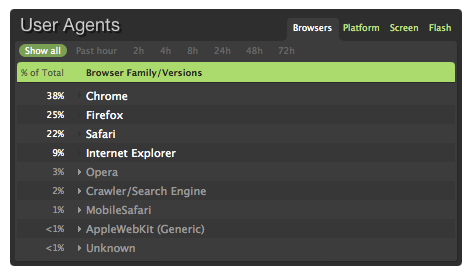
I just started using Mint to track statistics on my site. I’ve been using Google Analytics for a long time, and I will continue to do so, but it is definitely geared more towards sites trying to earn money. Mint seemed to offer a more streamlined and customizable interface for people who just want to look at stats.
Mint is a pluggable, extensible stats system. Mint modules are known as “peppers,” and each one provides some small functionality. There is a default pepper that provides some basic stats functionality like page views, unique visitors, search terms that brought those visitors to your site, and which pages they are looking at. There are a large number of official and community peppers over at the Peppermill that offer much more functionality and statistical views.
Installation
Installing Mint was a breeze. I just followed the simple instructions and I was good to go. If you have unfettered access to your server (via ssh) you should have no issues.
Issues with mod_pagespeed
I did run into a couple strange display issues when I went to view my Mint stats. Each pane took up the maximum width when it was opened. Even though I could view all my stats, the interface didn’t look good. After posting in the forum and fruitlessly trying to edit the Mint source code, I disabled mod_pagespeed on the hunch that my code changes weren’t taking effect because mod_pagespeed was caching everything. All of a sudden, the Mint interface looked fine, and it turned out that my small tweaks didn’t really make much of a difference after all. I still haven’t figured out exactly why mod_pagespeed was causing issues, but disabling it sure did fix them. If anyone has any insight into this, please let me know.
Peppers
I mentioned that Mint is pluggable and extensible. In fact, that is its entire basis: every bit of functionality is provided by modular plugins called peppers. Mint comes with the default pepper that I mentioned before, but there are many more available. I use a number of them.
The default Mint interface isn’t that great for a smaller screen like the iPhone, so this pepper displays an optimized interface when you view Mint on an iPhone.
A lot of analytics apps try to show you where your visitors come from, and that information is important. You might be interested in where your visitors go next, so this pepper shows your most popular outbound links.
If your blogging software has a search mechanism, this pepper shows you what your visitors are searching for. Note that this is different than the search engine queries that bring visitors to your site that the default pepper shows.
Sparklines provide a great way to view useful trends in a small space. This combined with the iPhone pepper makes checking visitor trends on the go a snap.
I use both Google analytics and Mint on my site, but I find myself looking at Mint much, much more often. It just offers a better view into the kind of people visiting your site, especially if you’re coming from a position of trying to understand what kind of content brings them to your site in the first place. Mint comes highly recommended.
]]><![CDATA[The Handle Pattern]]>2012-03-25T13:12:06-05:00http://blog.thomasupton.com/2012/03/the-handle-patternI’m not entirely sure if there’s a better name for this pattern that already exists, but I like “handle pattern” to describe this method of keeping track of and managing “subscriptions”.
varsubscriber=(function(){var_listeners={};vars={// Listen to a channel and call a callback when that channel fireslisten:function(channel,cb){// Add the callback to the list of listeners on the given channel_listeners[channel]=_listeners[channel]||[];_listeners[channel].push(cb);return{// Return an object that can be used to remove the callback from the channelunlisten:function(){// Remove the callback from the list of listeners on that channel_listeners[channel].splice(_listeners[channel].indexOf(cb),1);}}},// Manually fire events on a given channel.publish:function(channel){_listeners[channel]=_listeners[channel]||[];_listeners[channel].forEach(function(cb){cb();});}};returns;})();varh=subscriber.listen('update',function(){console.log('The update event was fired!');});subscriber.publish('update');// > "The update event was fired!"h.unlisten();subscriber.publish('update');// > <no output>
When you have an event-driven application, like a Javascript app that performs actions based on user interaction or based on back end “pushes” to a listening front end, you often have a central “publisher” that handles firing events when certain actions occur. It makes sense to have a static listen function that takes a “channel” and a callback function to call when that channel gets updated. The problem comes when you have to decide how to stop listening to that channel. If you go with a static unlisten function on the publisher with the same signature as listen (the channel and callback), you need to keep track of which callback is listening to which channel, and it can get messy.
Instead, listen can return a handle, which is just an object that contains a method unlisten that knows exactly how to stop listening on the specific channel and with the specific callback that was given to listen. Then, the caller just needs to keep track of the return values of listen (as opposed to the arguments to listen) in order to be able to unlisten later.
The DojoStateful interface uses this pattern to watch values on objects. If you watch a property, a callback can be fired each time that property changes. The return value of watch is a handle that can be used to stop watching that particular property value.
]]><![CDATA[Don't Commit FIXME or TODO]]>2012-02-24T12:41:13-06:00http://blog.thomasupton.com/2012/02/dont-commit-fixme-or-todo
123456789101112131415161718
<?phpfunctiongetObject($id){$object=null;// TODO Do we need to validate username?$objects=$this->db->retrieveForUsername($this->username);// FIXME Write `retrieveForIdAndUsername` instead of iterating hereforeach($objectsas$o){if($o->id()==$id){$object=$o;break;}}return$object;}
This shouldn’t happen. I’m not talking about the comically bad code – it’s a contrived example, but it proves the point – but about the little “notes” left by whoever committed this.
Do we need to validate the username? Probably. Find out, and take the necessary action. If you know your codebase well, it should take about ten seconds to know the answer.
The FIXME is a bit more time-consuming, but the payoff is greater. If you leave this FIXME, I’m going to assume one of two things: you’re a lazy programmer, or you’re a bad programmer. You’re lazy because you can’t be bothered to write something correctly or you’re bad because you don’t know how to write it correctly1.
Of course, use TODO or FIXME while you’re developing to keep a list of tasks that you have to finish before your feature is complete. Just don’t commit them to where other developers can see them and certainly don’t merge them to trunk.
If you’re lazy with that code now, there’s no way you’re going to overcome that laziness and come back to fix it later.
One could argue that being aware of bad code is better than nothing, but that’s fluffy. If you’re aware of a problem, you’re probably smart enough to do something about it. ↩
]]><![CDATA[Microwave Ovens Suck]]>2012-02-23T18:50:14-06:00http://blog.thomasupton.com/2012/02/microwave-ovens-suckReally. My microwave helpfully makes the numbers 1 through 6 shortcuts for running for that number of minutes, on full power. When’s the last time you needed to microwave something for six whole minutes?
Most of my microwaving involves re-heating leftovers or softening things like tortillas or butter. These things don’t take minutes; they take seconds. And if I have something that really need to warm up over the course of one or two minutes, it certainly doesn’t need to be that long at full power. Those preset buttons are absolutely useless. I need presets for 10, 20, and 30 seconds, and maybe 90, and at power levels of 5, 7, and “hi”. Not “high”, mind you, “hi”.
The rest of my microwaving time is spent trying to defrost frozen meat, like a chicken breast or a tilapia filet. There’s a button for this, yes, but it requires that I guess the weight of the thing I’m defrosting. I don’t own a kitchen scale, but even if I did, I sure as hell wouldn’t bust it out to figure out how to long I need to defrost my meat. Let me tell you what I’m defrosting, and then figure out how long to defrost it. Defrosting is not a new science or even science at all.
Here’s another irksome feature: when I open the microwave door before the timer goes off, I really appreciate that it remembers how much time was left. Once eight hours have passed, though, I think it’s safe to assume that I’m no longer in need of that timer. “PRESS START” is not helpful after that long. Show me the clock again after a reasonable amount of time has passed.
Another thing: that awful beeping sound. I know some smug person with too much time on his hands has Googled his unit’s manual and has memorized the arcane sequence of button presses required to mute the microwave, but I haven’t. Why is there not just a mute button? It’s not for lack of room: put it under my “9 “ button or in between “Defrost” and “Popcorn” (which always burns those poor defenseless kernels) or even in the place of the “Reminder” button, because I don’t keep my todo list on my microwave.
Can someone “Nest-ify” the microwave? I would buy one in a heartbeat.
]]><![CDATA[Configuration]]>2012-02-18T20:43:38-06:00http://blog.thomasupton.com/2012/02/configurationStarting a fresh environment on a new system isn’t a very common or regular task, but when you do, it comes in handy to have a quick and easy way to do it. To help with this, I keep my vimenvironment and my environment dot files in version control on Github.
I use Pathogen to manage my vim plugins. I follow the examples in this great article on plugin management with Pathogen to keep most of my plugins as git submodules. Installing my vim environment is just a matter of cloning the git repository and symlinking my vimrc.
I just spent some time cleaning up and organizing my dotfiles. I wasn’t even using my old dotfiles repository on GitHub, but I quickly rectified that. I now keep my dotfiles in ~/.dotfiles and symlink them to ~. There is a helper script in my dotfiles repository that sets up these symlinks.
Along with the usual bashrc, there are a few config files that aren’t as common. My ackrc defines a few convenient options and ignores directories with built artifacts in them. My (old) pythonrc defines a tab-completion function, although this might be outdated at this point. There’s a tm_properties config for TextMate 2.
Hopefully the fact that my configuration is out in the open will bring to light some useful features that I probably take for granted but you might not know about. So, go explore! Check out my inputrc, for example. I know that I discover new things almost every time I look at someone else’s vimrc or bashrc.
Do you have any configuration tips or tricks? Let me know.
Like most of the world, I love coffee. I usually drink a cup or two a day, and sometimes more. I’m lucky enough to live close to places that sell great coffee: Whole Foods roasts their own coffee, and there are numerous local places with great beans.
I usually make a full “batch” of coffee in a French press (or сafetière), but sometimes that’s too much. I know it’s considered blasphemous, but I got a Keurig single cup brewer for Christmas, and I absolutely love it. I was apprehensive about Keurig machines until I found out about refillable “K-Cups” that you could fill with your own, delicious coffee. I use the official Keurig “My K-Cup”, but that requires that you replace the entire holster mechanism each time. It’s not time consuming, but it is a bit annoying.
I discovered the Ekobrew, which is a filter that fits in the existing cup holster. Two of them are on their way to my house from Amazon right now.
Regardless of how it gets there, coffee from the Keurig is (perhaps surprisingly) pleasant. It’s not the best cup of coffee, but it’s quick, easy, and clean.
I still use the French press when I need to make a bigger batch of coffee or if I want to relax and enjoy a really great cup. I use the seemingly-ubiquitous Bodum French press and burr grinder and keep the coffee warm in my Zojirushi carafe. Coffee stays hot for hours on end, so I can make coffee in the morning and still enjoy it later in the afternoon. How I make coffee just depends on how much I need and what kind of mood I’m in.
One last thing: I also got a small stovetop espresso maker for Christmas, and it is amazing. When I want a treat, I make myself a café Americano: a bit of espresso in a normal-sized coffee cup and filled the rest of the way with hot water. Yum!
Full disclosure: I’ve linked to a number of products on Amazon in this post, and most of them contain my affiliate link. I’ll get a small kickback if anything is bought via these links. I will only ever post links to products that I use and love, and that is certainly the case with everything here. I’m passionate about my coffee, and I don’t want to mislead anyone. I have not included my affiliate link to the Ekobrew refillable K-Cup because I have not received or used it at this time.
]]><![CDATA[My Essential Tools]]>2012-01-05T16:16:30-06:00http://blog.thomasupton.com/2012/01/my-essential-toolsIn light of some recentexcellent posts about tools that smart people use, here are my essential tools that I used in 2011.
Hardware
I use a 15” MacBook Pro i5 with 8 GB of RAM. It’s quick and does everything I need it to. It’s not too bulky, but it’s certainly bigger than my older 13” MacBook. I keep toying with the idea of a MacBook Air, but I can’t justify the cost and I don’t want to use two machines.
I connect to an Apple LED Cinema Display when I’m at my standing desk, and I use a Logitech wireless keyboard and an Apple Magic Trackpad.
I do daily, local backups to a smallish volume on a 1 TB hard drive. The rest of the drive holds my music, photos, and other media.
Software
I do all of my work (both professionally and on this site) on VMs in “the cloud” that I ssh to with iTerm 2. I love that it can copy-on-select and the customizable colors are more robust than in other terminal apps. I used the built in Terminal.app for a long time, but the latest iTerm 2 is stable and excellent.
I also use HTTP Client to test our API, as well as both Firefox and Chrome.
When I write code, I usually use vim, but I’ve been testing out the recent alpha builds of TextMate 2.
When I write for this website or for my own personal notes, I’ve started using Byword to write and preview Markdown. Its fullscreen and “paragraph focus” modes are nice touches. I’ve heard good things about Marked, which allows Markdown previews from any app, but I haven’t used it yet.
I’m not a huge calendar user, but I do keep track of shows I attend and personal events on Google Calendar. I interact with my calendars with Fantastical. Its natural language event input is pretty great and lets me add events really quickly.
I work on and use a browser-based email client at work, but I also like to use Sparrow. The minimal interface stays out of the way, but all my mail is available quickly. Shortcuts for reply and reply all make it easy to respond to threads. A nice little touch: Sparrow automatically picked up the fact that I had an IMAP folder called Archive in my work email and started using it when I press Delete to archive messages.
I use Alfred all day every day. My usage statistics say I average 13.6 uses per day, but if you didn’t count weekends, holidays, or days that I don’t actually use my computer, I bet it’d be a lot higher. I love the clipboard management.
I occasionally use Cloud to quickly upload screenshots, but I don’t use it for much else.
I use Dropbox to manage files, share some music with friends, and back up certain documents. I also store my (encrypted) 1Password data on Dropbox so that I can access my passwords from anywhere.
Divvy and Stay are two window management tools that I use all the time. When I disconnect from my display, Stay puts my windows back to where I want them. It doesn’t quite work with Chrome, but everything else works well. Divvy lets me resize windows on a custom-sized grid. You can even define shortcuts – I use “c” for a centered window and “6” for a window taking up 60% of the right side of the screen.
I recently started using Evernote, but I haven’t gotten into it just yet. I’ll have more to write about that when learn how to use it and actually start using it more. I do use Evernote’s Clearly browser extension to read articles on line.
For my musical pleasure throughout the day, I still use iTunes a lot of the time. However, Rdio (with Airfoil) is usually how I listen to music these days. Airfoil makes it easy to listen to music in my living room via my Apple TV.
]]><![CDATA[Uptonian Thoughts on Twitter]]>2012-01-04T22:50:51-06:00http://blog.thomasupton.com/2012/01/uptonian-thoughts-on-twitterYou can now follow Uptonian Thoughts on Twitter! I’m using the Lessn Shortlinks and Simple Twitter Connect Wordpress plugins to tweet my posts to @uptonin.
I might still occasionally link to my own posts on my @thomasupton account, but all posts and articles, along with information about the site, will be available on @uptonin.